Complete Project Lifecycle from Concept to Installation
Project Overview
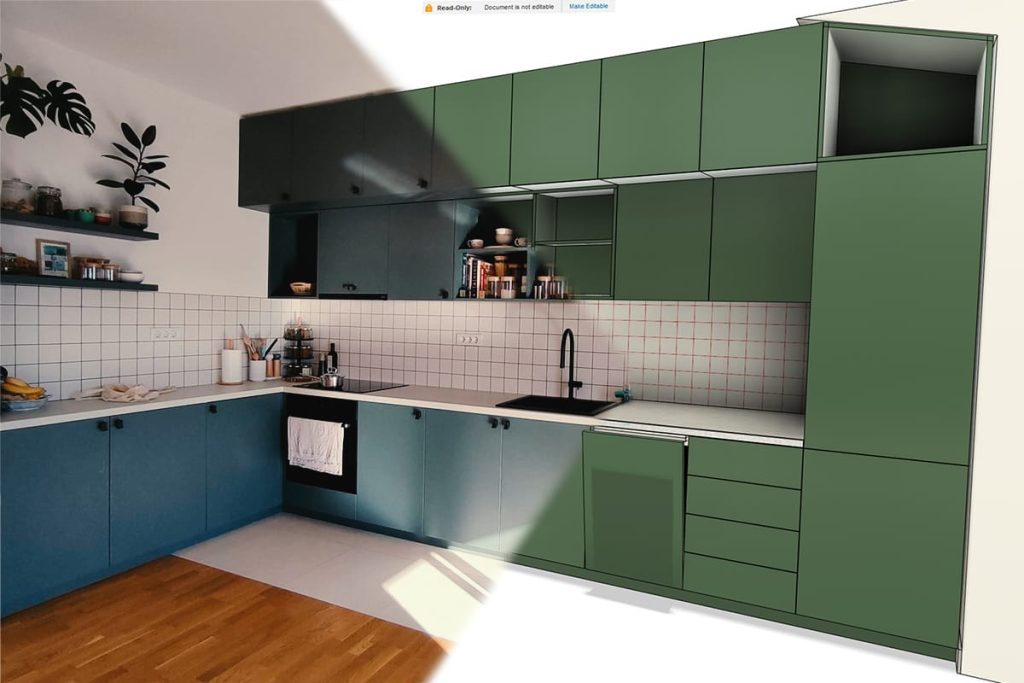
Challenge: Design and build a complete custom kitchen from scratch, maximizing functionality within specific dimensional constraints while maintaining high-quality craftsmanship.
Approach: Full CAD design in Fusion 360, detailed BOM generation, precision CNC manufacturing, custom 3D printed tooling, and complete construction.
Result: Fully functional kitchen completed in 10 days of active work, and great durability after 3+ years of daily use, validating long-term decisions.
The Challenge
When moving in together with my fiancee, we faced a new space with specific dimensions that needed a kitchen solution. After seeing typical contractor work in our area, we made a decision that it would be best if we would design and build it ourselves, to ensure it was done right.
Key Requirements:
- Maximize usable space within fixed dimension
- High precision for long-term durability
- Zero tolerance for bad craftsmanship
- Complete material efficiency (no waste)
Why This Approach?
Rather than compromise on quality and accept bad contractor work, I used my CAD design capabilities to create a design that would meet our standards while maintaining full control over the build process, and I performed a thorough technical research to find high-quality components and mechanisms for the design.
Design Phase: Engineering Precision
Timeline: 1 month of iterative design with 59 versions refined in Fusion 360
CAD Workflow:
- Space Modeling
- Precise measurement of installation space
- 3D model of room of all constraints, with angled ceiling
- Multiple verification measurements
- Component Design
- Individual modeling of each kitchen element
- Separate components for modular assembly
- Iterative Refinement
- 59 design iterations to optimize layout
- Balance between aesthetics and functionality
- Material efficiency considerations
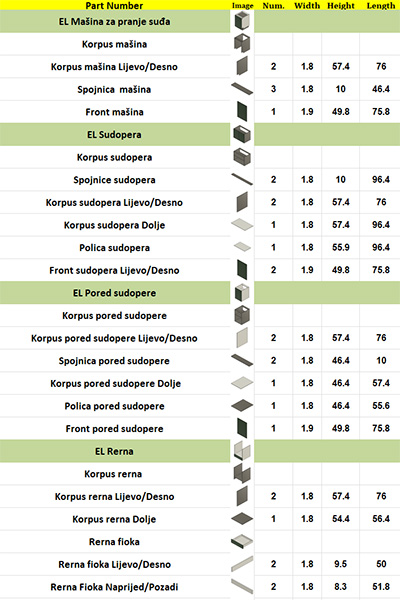
- Bill of Materials Generation
- Detailed BOM including all components:
- Wooden panel elements (cut list)
- Hardware: screws, hinges, sliders
- Plastic feet
- Mounting hardware
- Cost estimation (accurate prediction)
- Zero waste design – every panel optimized
Manufacturing Challenge: Precise Hinge Installation
The Problem: Standard Drilling Inadequacy
Traditional manual drilling for cabinet hinges creates several issues:
- Imprecision – holes slightly off-center or misaligned
- Loose fit – hinge rattles in oversized hole
- Weak connection – door is held only by two small 16mm screws on the hinge
- Short lifespan – movement causes screws to fall out over time
The Solution: CNC Precision + Custom Positioning Tool
Part 1: CNC-Routed Hinge Holes
Challenge: Create perfectly sized holes where hinges fit so precisely tight that they hold doors even without screws.
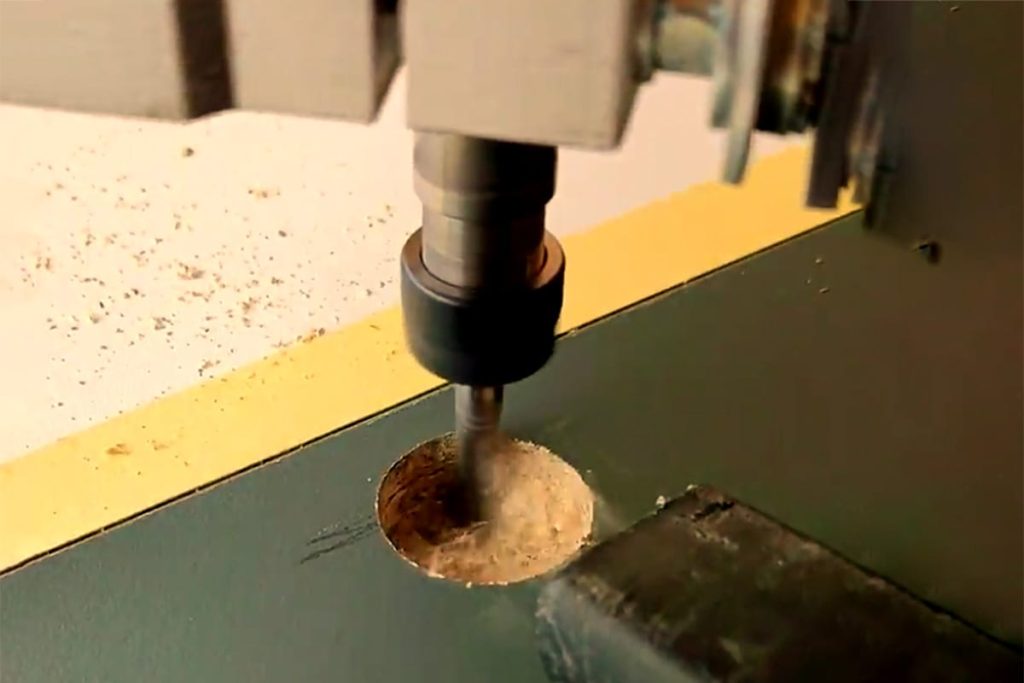
Approach:
- CNC routing instead of manual drilling
- Exact dimensional control, micrometer precision
- Perfect perpendicularity to surface
Specifications:
- 40 hinge holes total
- 55 seconds CNC time per hole
- Precision fit achieved: hinge holds door without screws
Trade-off Analysis:
- Manual drilling: Faster (~10 seconds per hole)
- CNC routing: Slower (55 seconds per hole)
- Decision: Sacrificed speed for precision and long-term quality
Result: After 3+ years of daily use, hinges show zero wiggle, no loosening, perfect operation.
Part 2: 3D Printed Hinge Positioning Tool
Challenge: Even with perfectly routed hinge holes, attaching hinges to cabinet frame requires exact screw placement. Misalignment by even 1mm causes doors to hang incorrectly, requiring tedious hinge adjustment.
Solution: Custom designed and 3D printed positioning tool for marking screw locations with precision.
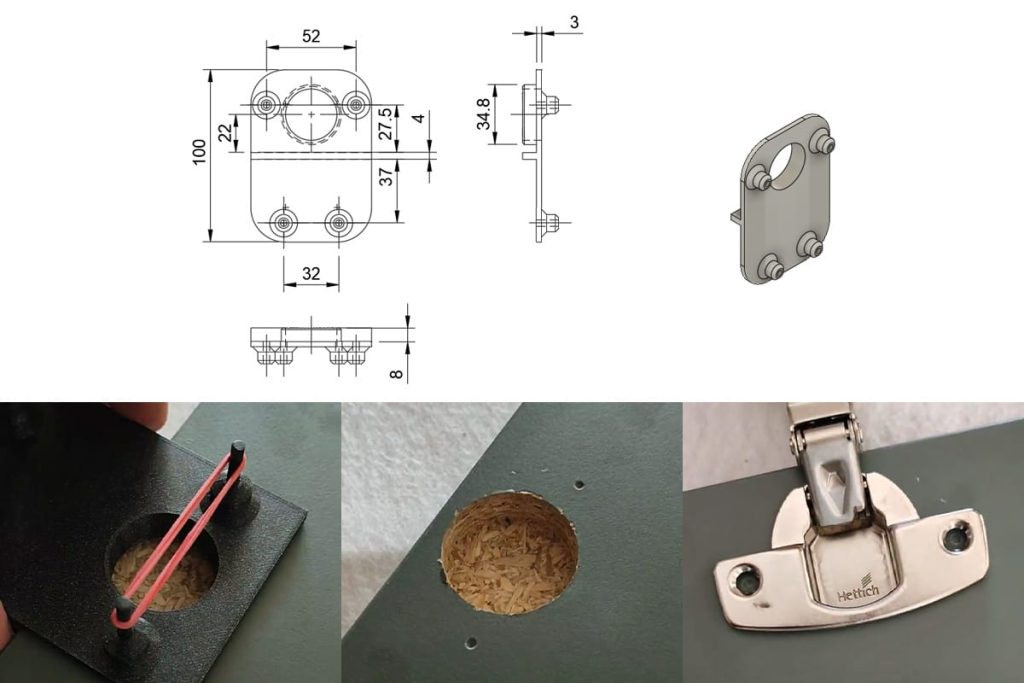
Tool Design:
- 4 metal pins held by rubber bands inside a 3D printed holder
- Tool fits precisely into CNC hole
- Pins align exactly with hinge screw positions
- Light hammer tap creates perfect positioning marks
Usage Workflow:
- Insert tool into hole made with CNC
- Tap pins lightly with hammer
- Remove tool and positioning marks are created
- Screw hinge onto marked positions
- Attach door to cabinet
Result:
“Doors attached to kitchen elements with almost no additional hinge calibration needed. The precision was that good.”
Future Value: Tool remains reusable for any future hinge installation projects.
Material Procurement and Build Phase
Procurement:
- 10-day lead time for custom-cut panels
- All materials delivered as specified in BOM
- Cost aligned closely with estimates
Construction Timeline:
- 10 days of active work over 1-month period
- Flexible schedule working around other commitments
- Systematic assembly following design
Problem-Solving During Build:
Example Challenge: Wall tile thickness oversight
- Issue: 10mm wall tiles in this specific place weren’t accounted for in design
- Impact: Bottom plate of upper element can’t fit because of the tile
- Solution: Small L-shaped cut on bottom plate side so it can fit perfectly with a wall
- Learning: Minor oversights manageable with on-site problem-solving
Results
Qualitative Success Factors:
- Precision Achieved: Hinges fit perfectly without requiring screws for structural support
- Long-term Quality: 3+ years of daily use with no degradation
- Zero Waste: Complete material efficiency through careful design
- Functional Design: Maximized utility within space constraints
- Aesthetic Success: Clean, professional appearance
- Problem-Solving: Minor oversights resolved during construction
- Tool Innovation: Created reusable positioning tool for future projects
Project at a Glance
| Aspect | Details |
| Timeline | 1 month design + 10 days build |
| Iterations | 59 design versions |
| Material Waste | 0% |
| Manufacturing | CNC Router + 3D Printer |
| Durability | 3+ years, zero maintenance |
| Innovation | Custom positioning tool for precision assembly |
How this applies to your project
The same systematic approach I used to build this kitchen is what I bring to every CAD project:
59 design versions weren’t indecision, they were systematic optimization. Planning every panel and cut saved money and materials.
In commercial work, this translates to BOM optimization, material cost reduction, and manufacturing efficiency.
When precision demanded it, I designed and 3D printed a positioning tool. In professional projects, I create automation scripts, custom macros, and workflow tools when standard methods fall short.
3+ years of perfect operation proves the engineering was sound. I don’t just deliver files, I design for durability, serviceability, and real-world performance.
Whether it’s CNC tooling, product design, or workflow optimization, this is my methodology: engineer systematically, validate through execution, prove it works long-term.
Why is matters
Most CAD designers stop at the 3D model. I designed this kitchen, engineered it for zero-waste manufacturing, built custom tools when precision demanded it, and constructed the entire thing .
After 3+ years of daily use there is no maintenance, perfect operation, and no loose hinges.
When you need someone who can take a project from concept through completion with precision, problem-solving ability, and quality focus, this is the level of execution you can expect.